
Editing videos on the video watch page
- Sign in to YouTube and go to the my_videos page
- Select the video that you'd like to edit (you do this by clicking the video thumbnail)
- You’ll then be taken to the video watch page. If you look above the
video player, you’ll see a toolbar. This is the Editing Toolbar. You
will use this to make edits to the video.

- On the toolbar you'll see various options:
- Edit video detail
- Edit annotations
- Edit captions/subtitles
- AudioSwap
- Insight Stats
- Click the option which corresponds to the action that you’d like to take. You'll then be directed to the section where you can start editing. Make your desired edit to the video (for example, add Annotations or an AudioSwap track, update the video's title or thumbnail image, adjust the embed settings, etc.)
- Don’t forget to click the “Save changes” button to save the edits that you've just made to your video
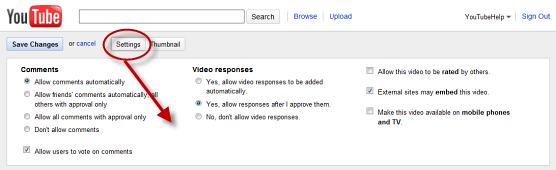
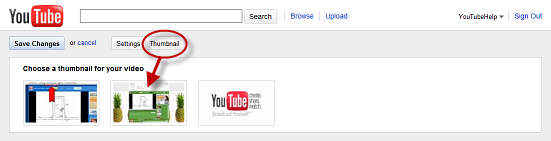
 Please note: Many of the video’s settings are accessed by clicking the “Edit video detail” button:
- Title
- Thumbnail selection
- Settings:
- Moderation for comments
- Video ratings
- Embedding
- Video responses

YouTube's Video Editor
The Video Editor is a free tool in your YouTube Account which allows you to edit various clips and produce an entirely new, edited video. Here’s what you can do with the Video Editor:
- Combine multiple videos that you’ve uploaded to create a new, longer video
- Trim at the beginning and/or end of your videos
- Add a soundtrack from our AudioSwap library
- Create new videos without worrying about file formats and publish the new video to YouTube with one click (no new upload is required)
1. Adding video clips in the Video Editor
Any of your uploads used in the Video Editor to make the new video are "clips". Your new video can be made up of various clips (1-7 clips permitted).
Once you publish the combination of clips, you’ll have a brand new video (with a different URL, view count, etc.).
Once you publish the combination of clips, you’ll have a brand new video (with a different URL, view count, etc.).
Getting Started:
- In the Media Picker, select the clip(s) which you’d like to edit.
- Click the "plus" icon (+) at the side of the clip. Clicking the "plus" icon will add the clip to the storyboard. You can also drag and drop the clip down to the storyboard.
- Once you’ve added your video clips to the storyboard, you’ll be ready to edit the video clips. You can learn how to do this in the next section (Editing individual clips).

2. Editing individual clips
If you’d like to shorten any of the video clips, you
can do so in the "Clip Editor". To select a clip to edit in the Clip
Editor, just hover over the clip and click the "Scissors" icon.
 You’ll now see that particular clip appear in the Clip Editor. From here, you can trim and shorten the clip.
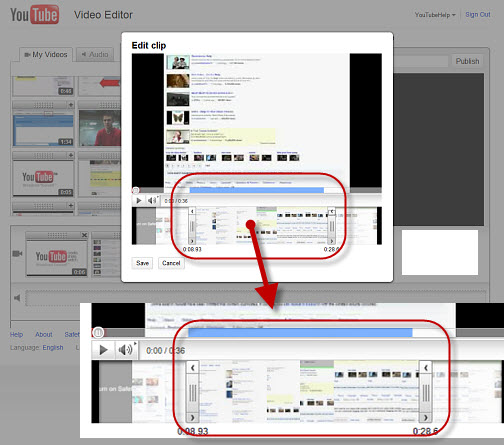 In order to shorten the clip, select the grey clip trimmer at the
beginning and/or end of the source video's frames (see image below).
Drag the grey trimmer to the section of the clip which you’d like to
trim.
In order to shorten the clip, select the grey clip trimmer at the
beginning and/or end of the source video's frames (see image below).
Drag the grey trimmer to the section of the clip which you’d like to
trim.
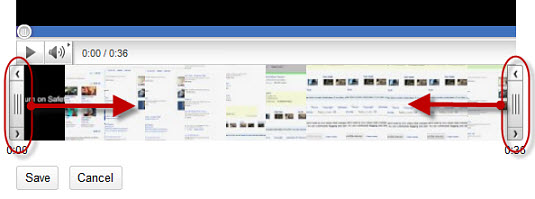
When you’ve selected the desired portion(s) of the clip to cut, click the "Save" button. By clicking the "Save" button, you’ll save the changes that you've made to the clip, and the (now shortened) clip will appear back on the storyboard on the Video Editor main page.
You can edit/shorten all clips which you’ve added to the storyboard in the Clip Trimmer. You edit one clip at a time. In order to trim and shorten each of the separate clips, just follow the steps listed above and edit the clips in the Clip Trimmer. Don’t forget to click "Save" when you’ve finished editing the clip.
Clip Trimmer Tips and Tricks
You’ll now see that particular clip appear in the Clip Editor. From here, you can trim and shorten the clip.
In order to shorten the clip, select the grey clip trimmer at the
beginning and/or end of the source video's frames (see image below).
Drag the grey trimmer to the section of the clip which you’d like to
trim.When you’ve selected the desired portion(s) of the clip to cut, click the "Save" button. By clicking the "Save" button, you’ll save the changes that you've made to the clip, and the (now shortened) clip will appear back on the storyboard on the Video Editor main page.
You can edit/shorten all clips which you’ve added to the storyboard in the Clip Trimmer. You edit one clip at a time. In order to trim and shorten each of the separate clips, just follow the steps listed above and edit the clips in the Clip Trimmer. Don’t forget to click "Save" when you’ve finished editing the clip.
Clip Trimmer Tips and Tricks
- The edge inside the grey bars (which you drag to shorten the video) is what counts. The clip will be cut from the point within the grey bars, not the point outside the grey bars.
- You can trim a clip to a 15th of a second. For longer videos, if you click the nudge buttons (arrow buttons), this will nudge the trimmer forwards or backwards a 15th of a second from its current position
- When you add a video clip to the storyboard, the video which appears in the player is the actual video from YouTube.com. This video loads and skips backwards and forwards like any YouTube video. When you add a clip to the Clip Trimmer however, you will first need to wait for the clip to load before being able to skip back and forth.
3. Adding an audio track
You can add a new audio track to your the video in the Video Editor. Here's how:
- In the Media Picker, click the "Audio Tab". You’ll then see audio options appear. These audio tracks come from YouTube’s AudioSwap library.
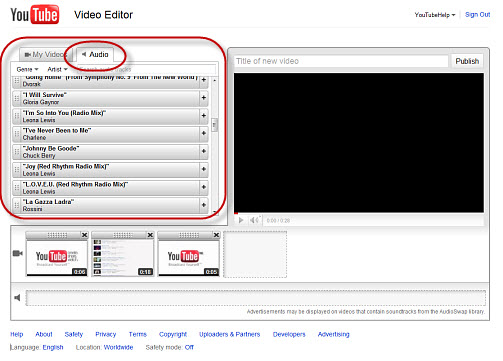
- You can browse the AudioSwap tracks by genre, artist and typing a query into the AudioSwap search bar.
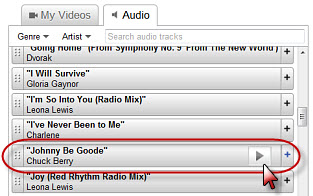
- To preview the audio tracks listed, hover your mouse over the audio track in question and click the "Play" button. A preview will then play for you.
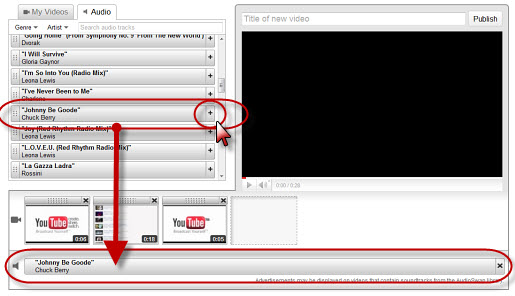
- To add an audio track to your clips, click the "plus" icon (+) on the audio-track. This will add the audio track to the storyboard. Similarly, you can drag and drop the audio track into the audio section of the storyboard.
- You cannot trim or edit the audio track in Editor. The audio track will span the entire length of the video clips and will stop when the video ends. You also cannot select particular sections of the audio track: the audio will start at the beginning and will be cut off when the video ends.
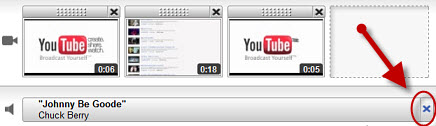
- To delete the audio track entirely, just click the "X" icon on the audio track on the storyboard. You can also replace the audio track by dragging another track from the media picker down to the storyboard. The existing track will be replaced immediately with the new track.
Please Note: When you add a new
soundtrack, the audio track on your video will be replaced permanently.
After you change your video's soundtrack to one from the AudioSwap
library, the video won't be eligible for revenue sharing. In addition,
advertisements may be displayed on videos that contain soundtracks from
the AudioSwap library.
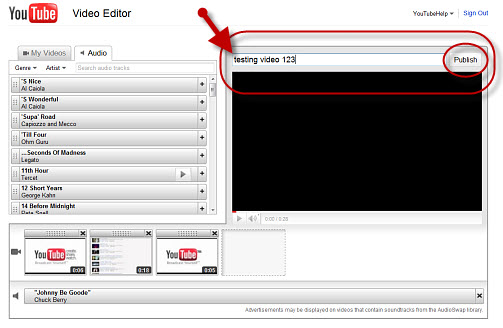
4. Final steps and publishing your new video
Now that you’ve added and edited your video clip(s) and audio track,
you’re almost ready to publish your new video. As a final step, you just
need to add the new video’s title in the title field. Once you’ve done this, click "Publish". Your video will then start to be published.
Congratulations - you've finished!
The video will take a while to process (just like any normal upload). You can check the video’s processing status on the my_videos page of your Account. Your new video will not have the same URL as any of the clips used to create it. The new video has an entirely separate URL of its own.
Take a look at this playlist (of videos made by fellow YouTube users) to learn more about using the Video Editor:
No comments:
Post a Comment